I briefly mentioned last week that I was participating in this loom-along from Craftzine. Well, I finished my Alice Wrist Warmers!
They look good and keep my hands toasty warm. I ended up modifying the pattern because I was unhappy with the stretch in the knit of the original pattern.
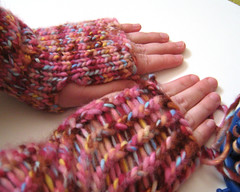
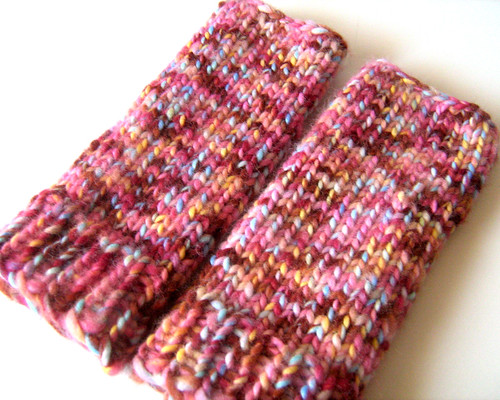
The wrist warmer on the right hand was made following the loom-along pattern and the one on the left hand is my modified version. I definitly prefer the tighter knit of the wrist warmer on the left hand.
If you are interested in making the wrist warmers with my modifications here is the sort of pattern.
Materials:
Knifty Knitter blue small round loom (24 pegs)
Approximately 100 yards bulky yarn
Instructions: (links are videos from the Purling Sprite and Kelly Jones)
1. Cast on using the e-wrap cast on method.
2. Eight rows of K1P1 Loom Instructions: knit purl.
3. Knit all stitches for 20 rows.
4. For the thumb hole you will knit back and forth. Start by going in the backwards direction (counter-clockwise, if you loom knit clockwise). First knit peg 24 and 23 together. Then knit pegs 22 through 3 individually. Next knit pegs 1 and 2 together.
5. Knit two more rows and add a stitch on to peg 1 at the end. Continue to knit one more row and add a stitch on to peg 24.
6. Start knitting in the round once again for 12 rows.
7. Bind off, make the second one, then wear and enjoy!
Note: I used the crochet bind off and it is a little snug. If you need a much stretchier bind off (so your fingers aren't constrained) try a super-stretchy bind off.1. Cast on using the e-wrap cast on method.
2. Eight rows of K1P1 Loom Instructions: knit purl.
3. Knit all stitches for 20 rows.
4. For the thumb hole you will knit back and forth. Start by going in the backwards direction (counter-clockwise, if you loom knit clockwise). First knit peg 24 and 23 together. Then knit pegs 22 through 3 individually. Next knit pegs 1 and 2 together.
5. Knit two more rows and add a stitch on to peg 1 at the end. Continue to knit one more row and add a stitch on to peg 24.
6. Start knitting in the round once again for 12 rows.
7. Bind off, make the second one, then wear and enjoy!
Update: I closed comments because I was getting way too much spam!
but it seems my looms are in nampa ;-)
ReplyDeleteAnd after all your had work YOU WON :-)
ReplyDeleteI'm very new to loom knitting, but these seem simple enough for me to figure out :) The only part I'm confused about is when you say to knit two stitches together. I've tried to find an illustration or video to clarify this for me, but youtube and google are failing me for once. Could you explain a little further what you mean? Also, the other alice wrist warmer patterns I've come across say to use the smaller flower loom, do you find that the blue loom makes them too loose? I'm making mine for a fairly small high schooler and I would like them to fit fairly snug.
ReplyDeletestelladorro, they are fairly simple to make.
ReplyDeleteto knit two stitches together take the loop off the first peg and place it on the second peg then knit as if it were just one loop.
the second photo in this post shows the finished product knit on the small flower loom. i didn't like how stretched out they looked once i put them on. by switching to the blue loom and using a 'knit stitch' rather than the common 'e-wrap' method the finished warmers have a tighter knit and fit my hand quite well. you could try using a 'flat stitch' instead to make it tighter/smaller. instructions for both the knit and flat stitches can be found here: knit stitches on loom knitting help
These wrist warmers are exactly what I was looking for!
ReplyDeleteWhat bind off method did you use?
Thank you for sharing these with us, and thank you for the modified pattern...it will save us from a lot of trial and error!!!
Thanks! I think I used the crochet bind off; it doesn't have much give, if I were to do it again I would make them a little bit looser at the top.
ReplyDeleteI'm so glad you mentioned that you would use a looser bind off method if you were to do them again because I decided to try the super stretchy bind off. It curls slightly, but looks OK when on. I'm now working on my second one and love them!
ReplyDeleteI forgot to mention that I have a small hand and wrist, so I used a long loom with clips, making it 18 pegs. They fit perfectly!
ReplyDeleteglad to hear!
ReplyDeleteI love your pattern! I made these in a blue blend yarn. They fit perfectly! They are fabulous! I get a lot of compliments on them. Thank you for your pattern design!
ReplyDeleteDoes the knit purl for 8 rows keep the top from rolling over because that's the problem I have when I try to make leg warmers or scarves on my knifty knitter?
ReplyDeleteThe bottom doesn't roll up on mine.
ReplyDeleteIt would be great if you chose to make a video on how you make these. I'm a visual learner, so written instructions tend to trip me up somewhat. I'd love to make these.
ReplyDeleteI am sorry I don't have the capabilities to do a video at this time. I could probably write up a chart if that would help. Let me know if you are interested and I will start work on it.
DeleteI have different sizes of the rectangle looms, how can i makes these for a 5 year old?
ReplyDeleteThis may take some trial and error, but here are my suggestions for a starting point:
Delete-cast on 14 pegs
-6 rounds of ribbing
-10 rounds knit
-decrease only one stitch for the thumb and knit only one row with the decrease. (knit pegs 14 and 13 together, knit back to peg 1, knit around to peg 13, wrap peg 14, knit peg 1 and continue in pattern)
-6 rounds knit then bind off
Good Luck! I'd love to see how they turn out.
Thanks so much! EDIT: Ok umm is there a video tut out there that shows how to bind off like you did? I did the standard way and it was so tight she couldnt get it on her hand :( But the rest of it fit good.
DeleteI'm glad that sizing worked! I used the crochet cast off and it was snug, another commenter used the super-stretchy bind off and said it worked well. Here is a link to a video by Kelly Jones showing the super-stretchy bind off: http://youtu.be/hGMtqK-UrDw
DeleteHi. I had to adjust somewhat because of the size thread i was using, it was smaller, so the knit rows i had to make was 26. But i love it thanks!
DeleteThese are so beautiful...I am so new to knitting that I can't seem to get them right yet :-( Will wait til after I take a class. What kind of yarn did you use and do you make any to sell?
ReplyDeletethank you and good luck at you knitting class!
Deletethe yarn i used is lion brand landscapes in rose garden which has been discontinued. i don't make any of these to sell.
How do I bind this s*it off?! I tore my fingers off trying to bind it off, it was a tight weave. Also, how on earth are your bottoms straight and not curled around like mine always are?
ReplyDeleteTo bind off I recommend trying this super-stretchy bind off. For this method you weave working yarn up and down through your stitches with a sewing needle, it ends up looking like the e-wrap cast on and is easy on the fingers.
DeleteTry blocking to help keep the e-wrap cast on edge from curling. The Purl Bee has an excellent tutorial. I have a bit of a curl in mine, but it isn't noticeable while I'm wearing them.
I use the "e wrap for four inches then flip the bottom row back up on the loom and knit off" method for the bottom edge. It's the same one you use to make the brim of a hat (only on this project I call it a cuff lol). It'll make you a 2 inch cuff and look really nice; you can do any length you want, just knit for double the length of the cuff and flip over. I have a mitten loom which works wonders for this project; it's just the right size, so no stretching or tightness and I just use the e wrap stitch.
ReplyDelete